Down south, fried chicken is a religion, and people swear by their own recipes and family traditions. I am no authority in Southern hospitality, but will help you look deeper into the world of the amazing comfort food… Southern Fried Chicken!
History
The Scots, and later Scottish immigrants to the southern United States, had a tradition of deep frying chicken in fat as far back as the middle ages, unlike their English counterparts who baked or boiled chicken. When it was introduced to the American South, fried chicken became a common staple. Later, Africans brought over on the slave trade, became cooks in many southern households and incorporated seasonings and spices that were absent in traditional Scottish cuisine, enriching the flavor. Since
fried chicken traveled well in hot weather before refrigeration was
commonplace, it gained further favor. In the south, Fried chicken
continues to be among this region's top choices for "Sunday dinner." Holidays such as Independence Day and other gatherings often feature this dish as well.
In Asia, they have their own version of this dish, called
Crispy fried chicken, a standard dish in the Cantonese cuisine of southern China and Hong Kong. The chicken is fried in such a way that the skin is extremely crunchy, but the white meat is relatively soft. The dish often served with two side dishes, a pepper salt and prawn crackers The pepper salt, colored dark white to gray, is dry-fried separately in a wok. Traditionally, it is to be eaten at night. It is also one of the traditional chicken dishes used in Chinese weddings and other Asian weddings.
Korean fried chicken or seasoned chicken is traditionally eaten as fast food, at bars, or as an after meal snack in Korea. It is not often consumed as a meal. It is prepared in a way that removes the fat from the skin, resulting in a crust described by Julia Moskin of The New York Times as a "thin, crackly and almost transparent". The chickens are usually seasoned with spices after being fried. In South Korea, chickens are relatively small, so Korean fried chicken restaurants fry whole chickens before hacking it into bits. In the United States, chickens tend to be larger and Korean restaurants find it more difficult to deal with large breasts and thighs. As a result, many Korean fried chicken restaurants in the United States usually serve wings and small drumsticks. Pickled radishes, beer, and soju are often served with Korean fried chicken.
So lets get to the how to's. Making fried chicken is a LOT of work (at least according to today’s 30 minute meal prep orientation). The preparation of the chicken, the breading of the chicken, the temperature regulation, the actual cooking, the cleanup of the cooker, the kitchen and you, but the work is worth it in the delight of biting into a fresh, warm, crunchy, piece of perfectly golden, home-fried chicken. It's a food of love thing.
There are three main techniques for frying chickens: pan frying, deep frying and broasting;
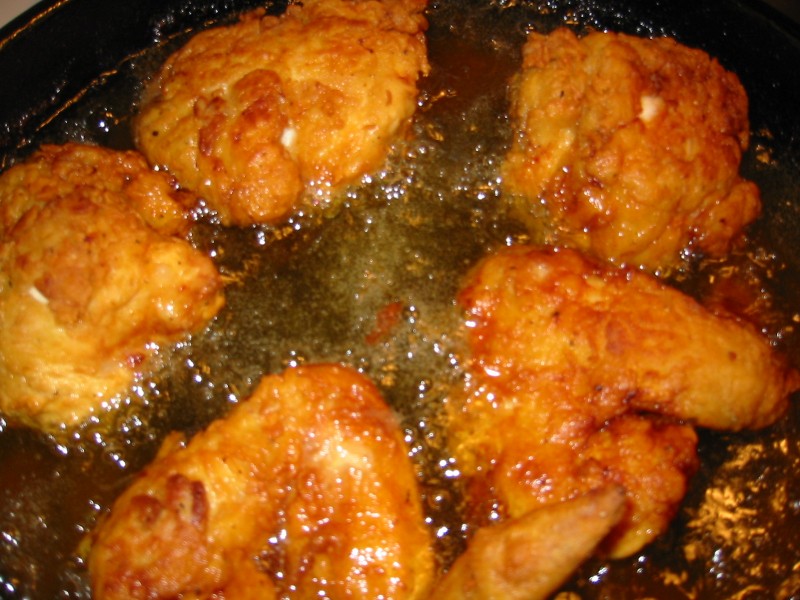
Pan frying (or shallow frying) requires a frying pan of sturdy construction (cast iron works best) and a source of fat that does not fully immerse the chicken. Generally the fat is heated to a temperature hot enough to seal (without browning, at this point) the outside of the chicken pieces. Once the pieces have been added to the hot fat and sealed, the temperature is reduced. There is debate as to how often to turn the chicken pieces, with one camp arguing for often turning and even browning, and the other camp pushing for letting the pieces render skin side down and only turning when absolutely necessary. Once the chicken pieces are close to being done the temperature is raised and the pieces are browned to the desired color (some cooks add small amounts of butter at this point to enhance browning). The moisture from the chicken that sticks and browns on the bottom of the pan become the fonds required to make gravy. Chicken Maryland is made when the pan of chicken pieces, and fat, is placed in the oven to cook for a majority of the overall cooking time, basically "fried in the oven
."
Deep frying requires a deep fryer or other device in which the chicken pieces can be completely submerged in hot fat. The pieces are floured or battered using a batter of flour and liquid (and seasonings) mixed together. The batter can/may contain ingredients like eggs, milk, and leavening. The fat is heated in the deep fryer to the desired temperature. The pieces are added to the fat and a constant temperature is maintained throughout the cooking process.
 |
| Broaster |
Broasting uses a pressure cooker to accelerate the process. The moisture inside the chicken becomes steam and increases the pressure in the cooker, lowering the cooking temperature needed. The steam also cooks the chicken through, but still allows the pieces to be moist and tender while maintaining a crisp coating. Fat is heated in a pressure cooker. Chicken pieces are then floured or battered and then placed in the hot fat. The lid is placed on the pressure cooker, and the chicken pieces are thus fried under pressure
Selecting the best chicken
The best size chicken to fry is a 4-pound fryer. Never fry any chicken larger than 5 pounds as it will take the pieces too long to cook. Chickens smaller than 3 pounds are too small for good fried chicken.Traditional fried chicken HAS SKIN. Skinless fried chicken is a weird invention of those who think that it makes for a lower-fat chicken (and what are those people doing eating Fried Chicken in the first place?) The skin is necessary to provide the support for the breading, and to add that element of 'crisp' that is the goal of the great chicken fryer. I also think that the skin actually helps keep the chicken meat lower in fat as it serves to shield the meat from the fat.
Follow these steps below to help you along the way:
Marinating: Some say that marinating or soaking the chicken in a brine or buttermilk for 30 mins to a few hours can increase tenderness and develop great flavor profiles.
Coating: Apply different coatings and coating techniques. Try dipping the chicken in milk, then flour, then milk, and then the flour again. Some cast-iron cooks dip it in a milk-egg mixture and then dredge it in flour. Some don't use flour at all and cover it with cracker crumbs, potato flakes, or cornmeal.
Air Drying: After you coat your chicken, let it air-dry. Air-drying your chicken for 20 minutes to a half hour after it has been coated lets the coating firm up and produces a crispier crust.
Seasoning: Use plain old salt and pepper or create special seasoning mixes. You may want to season the flour that you dredge the chicken through; you can also season the chicken itself. Some people swear that paprika enhances the flavor; others claim it's just there for color.
Cooking: The real secret to the ultimate in comfort food, Southern Fried Chicken, isn't in the recipe; it's in the cooking. Properly pan-fried chicken is tender and moist (not greasy) on the inside and golden brown and crispy on the outside. Keep your oil very hot. To make sure that your chicken doesn't get greasy, you want the oil hot enough (375 degrees Fahrenheit) that the water in the chicken stays above the boiling point during frying. The force of the steam leaving the chicken keeps the oil from being absorbed. The hot oil also makes the outside wonderfully crispy.
Some tips for keeping the oil at the temperature you want are as follows:
- Use peanut oil, which has a hotter smoking point than vegetable oils or shortenings.
- Allow the chicken to come almost to room temperature before you cook it so that when you put it into the hot oil, it doesn't reduce the oil temperature as much as really cold chicken would.
- Don't overcrowd the chicken in the pan. Putting too many pieces in the pan causes the temperature to drop and takes it longer to heat up again. It can also cause the chicken to steam as opposed to fry.
- Use a deep-sided cast-iron skillet or Dutch oven and an iron cover. Cast iron is the cook's best friend when pan-frying. It absorbs heat evenly, eliminating hot spots and its ability to retain heat keeps the temperature of the oil as even as possible.
- Brown the chicken quickly to seal in the juices. After the initial browning, reduce the heat to allow the chicken to cook through without drying. Then return the heat to medium-high to re-crisp it before you remove it from the pan.
- Use tongs to turn and move the chicken. Tongs won't pierce the chicken and let the juice escape.
- Drain fried chicken on a paper towel and then place it on a metal wire cooling rack in a warm oven. This simple step keeps your cooked chicken crisp and warm. After all, what good is a crispier crust if it just gets soggy and cold while sitting in a puddle of oil?
- Serving: Make sure its crisp, hot, and you have a napkin handy! It's common to serve fried chicken with a creamy gravy, or a kicked up hot sauce.
Simple Southern Fried Chicken
Make 8 Pieces of Buttermilk Fried Chicken
Ingredients
For the marinade:
1 tsp salt
1 tsp black pepper
1 tsp paprika
1/2 tsp cayenne
1/2 tsp white pepper
1 tsp ground dried herbs, or poultry seasoning
2 cups buttermilk
3 1/2 pound chicken, cut in 8 pieces
For the seasoned flour:
2 cups flour
1 tsp salt
1 tsp paprika
1/4 tsp cayenne
1/2 tsp white pepper
1/2 tsp garlic powder
1/2 tsp onion powder
1-2 qt. Vegetable or Peanut oil (enough to fill a large cast iron pan 1/2 way)
Method
Add the marinade ingredients to a bowl and whisk together. Add the chicken parts and toss to coat well. Cover with plastic wrap, making sure the chicken is submerged. Refrigerate for 6 hours or more.
Mix together the seasoned flour ingredients in a large baking dish. Drain the chicken pieces and toss into the flour. Toss the chicken and coat completely with the flour mixture. Shake off and place on a rack and let dry for at least 1/2 hour before frying.
Fill a cast iron skillet halfway up with oil and heat to about 375 degrees F. Carefully add the chicken, leaving at least 2 inches between pieces and fry for 20-25 minutes, or until golden brown, reaching and internal temperature of 180 degrees F. Allow to drain on a wire rack for 5-10 minutes before serving.
Serve with smashed potatoes, brown gravy and some corn on the cob. And remember, be sure that the

love and effort you put into the preparation carries through to the plate and whatever your cooking pleasure, be it baked or fried, I hope these simple steps help you wow your friends and family.
..
Bon Appetit
Lou
Sources: Daniel Greene/Flickr, cooks.tuckawaytv.com, wkipedia.org, norecipes.com,
whatsfordinner.net


 love and effort you put into the preparation carries through to the plate and whatever your cooking pleasure, be it baked or fried, I hope these simple steps help you wow your friends and family...